System Galaxy Database Transfer Tool
This SGDatabase Transfer Tool automates backing up the Galaxy SQL database and transferring the database to Tech Support at Galaxy Control Systems.
Topics featured
Transferring the Galaxy SQL Database
This section provides instructions to transfer the SQL Database using the SG Transfer Tool.
Requirements:
-
The Database Transfer Tool must be run on the same computer that hosts the Galaxy SQL database (SysGal). tdue to Microsoft limitations that prohibit making file-level backups to external paths. In a default configuration, this should be the same computer that hosts the GCS Services.
-
You must know your current SQL Database Connection Settings and Login Credentials.
-
You must provide the valid email of a technical contact who is conversant on the database and system.
-
You must include a current, valid RMA Number that you receive from Tech Support.
-
Download the Database Transfer Tool here > http://gcs.li/KN4JG
-
Open the default browser on the computer that hosts the SysGal Database file (database or standalone server).
-
Paste the download link ( http://gcs.li/KN4JG ) into the browser’s URL field and browse to the Transfer Tool Download Page. Make note of where the ‘setup.exe’ file is downloaded/saved to.
-
Click on Install button on the Download Page to begin downloading the Transfer Tool.
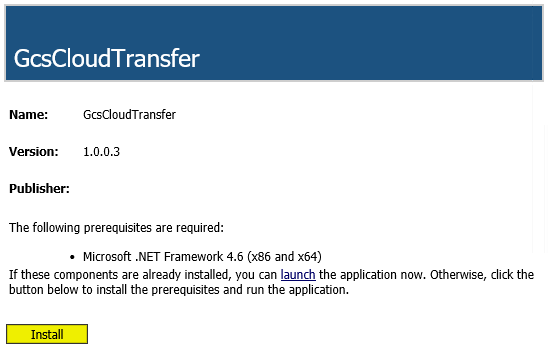
Page may appear differently based upon the browser or Windows version.
-
If prompted with a choice to Run or Save, choose Run.
It make take a few minutes to complete the download.
-
Security settings may prompt you with choices:
-
Click Actions (or in later Windows versions, click the ‘more’ link)
-
(Optionally) If you chose to download the file, you can double-click the setup.exe file in the Downloads folder after downloading is completed. If you see a .tmp file, wait for the setup file to finish downloading.

-
-
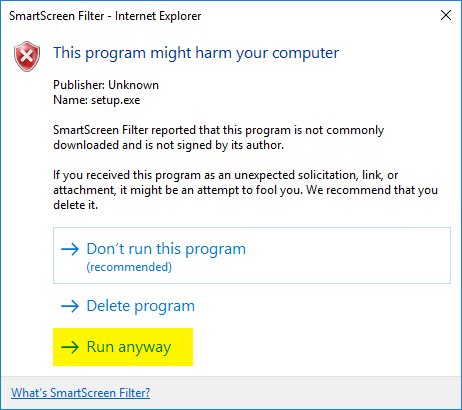
Select Run Anyway from the Windows Security popup to run/open the Transfer Tool.
Result: the Transfer Tool will open.
-
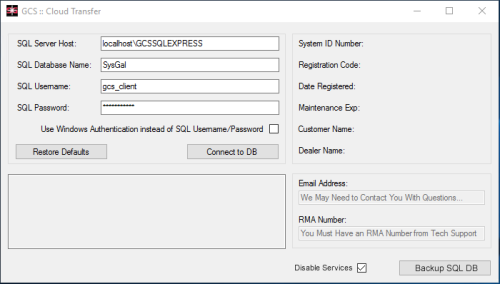
When the Transfer Tool opens, the SQL Connection Settings are prefilled with the original connection settings and login credentials that were valid when the system was first installed (see screen below).
-
Enter your system’s current SQL Connection Settings if they are different than the prefilled settings shown in your Transfer Tool.
-
Click the Connect to DB button when you have the correct connection values entered.
Note: the Restore Defaults button will reset all SQL fields to the original prefilled SQL Settings that displayed when the Tool was first opened.RESULT: Once you are successfully connected, the RMA and Email fields will unlock.
-
-
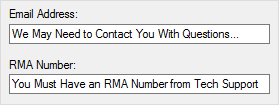
Enter a valid Email Address and your RMA Number in the designated fields ...
-
In the Email Address field, you need to provide an email contact for a person who can answer technical questions about the SG database and the site/installation (as needed).
-
The RMA Number must be obtained from Galaxy Technical Support before transferring - please do not upload unsolicited databases. An unsolicited database cannot be worked on due to missing technical information.
-
-
(Recommended) You must “check” the Disable Services checkbox before proceeding - or manually stop GCS Services on the computer where the services reside if different than the database.
IMPORTANT: the Disable Services checkbox should be “checked” to prevent data loss on a running system.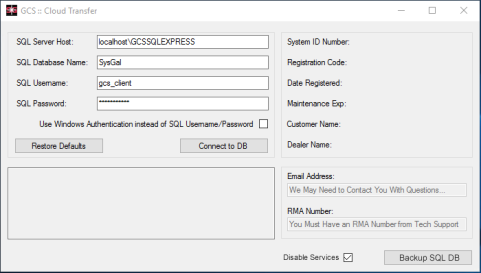
-
Click the Backup SQL DB button to begin the backup and transfer.
-
You can close the Transfer Tool when the transfer operation is completed.
NOTE: Depending on the size of the database, this process can be lengthy.RESULT: The Tool will periodically display status messages, ending with “Operation Complete!”

-
When the Transfer Tool is finished, you must notify Technical Support that your database is finished transferring.
Troubleshooting Error Results
If you received an error message or other failure while attempting to run the transfer tool, use the following process:
-
Completely close the Transfer Tool and any error windows it may have spawned.
-
Go to the location where ‘setup.exe’ was downloaded/saved (noted in the initial installation steps).
-
Right-click on ‘setup.exe’ and choose ‘Run as administrator’
-
Accept any security prompts, then follow the instructions from the beginning of this procedure.
